
Spooktacular & Healthy: Crafting the Ultimate Halloween Fruit Tray for Kids
Halloween conjures images of costumes, haunted houses, and, of course, a mountain of candy. While indulging in sweet treats is part of the holiday fun, it’s also a fantastic opportunity to introduce some nutritious options that are equally festive and exciting. This year, ditch some of the sugar and transform everyday fruits – along with a delightful veggie surprise – into a show-stopping Halloween Fruit Tray that promises spooky fun without the sugar crash.
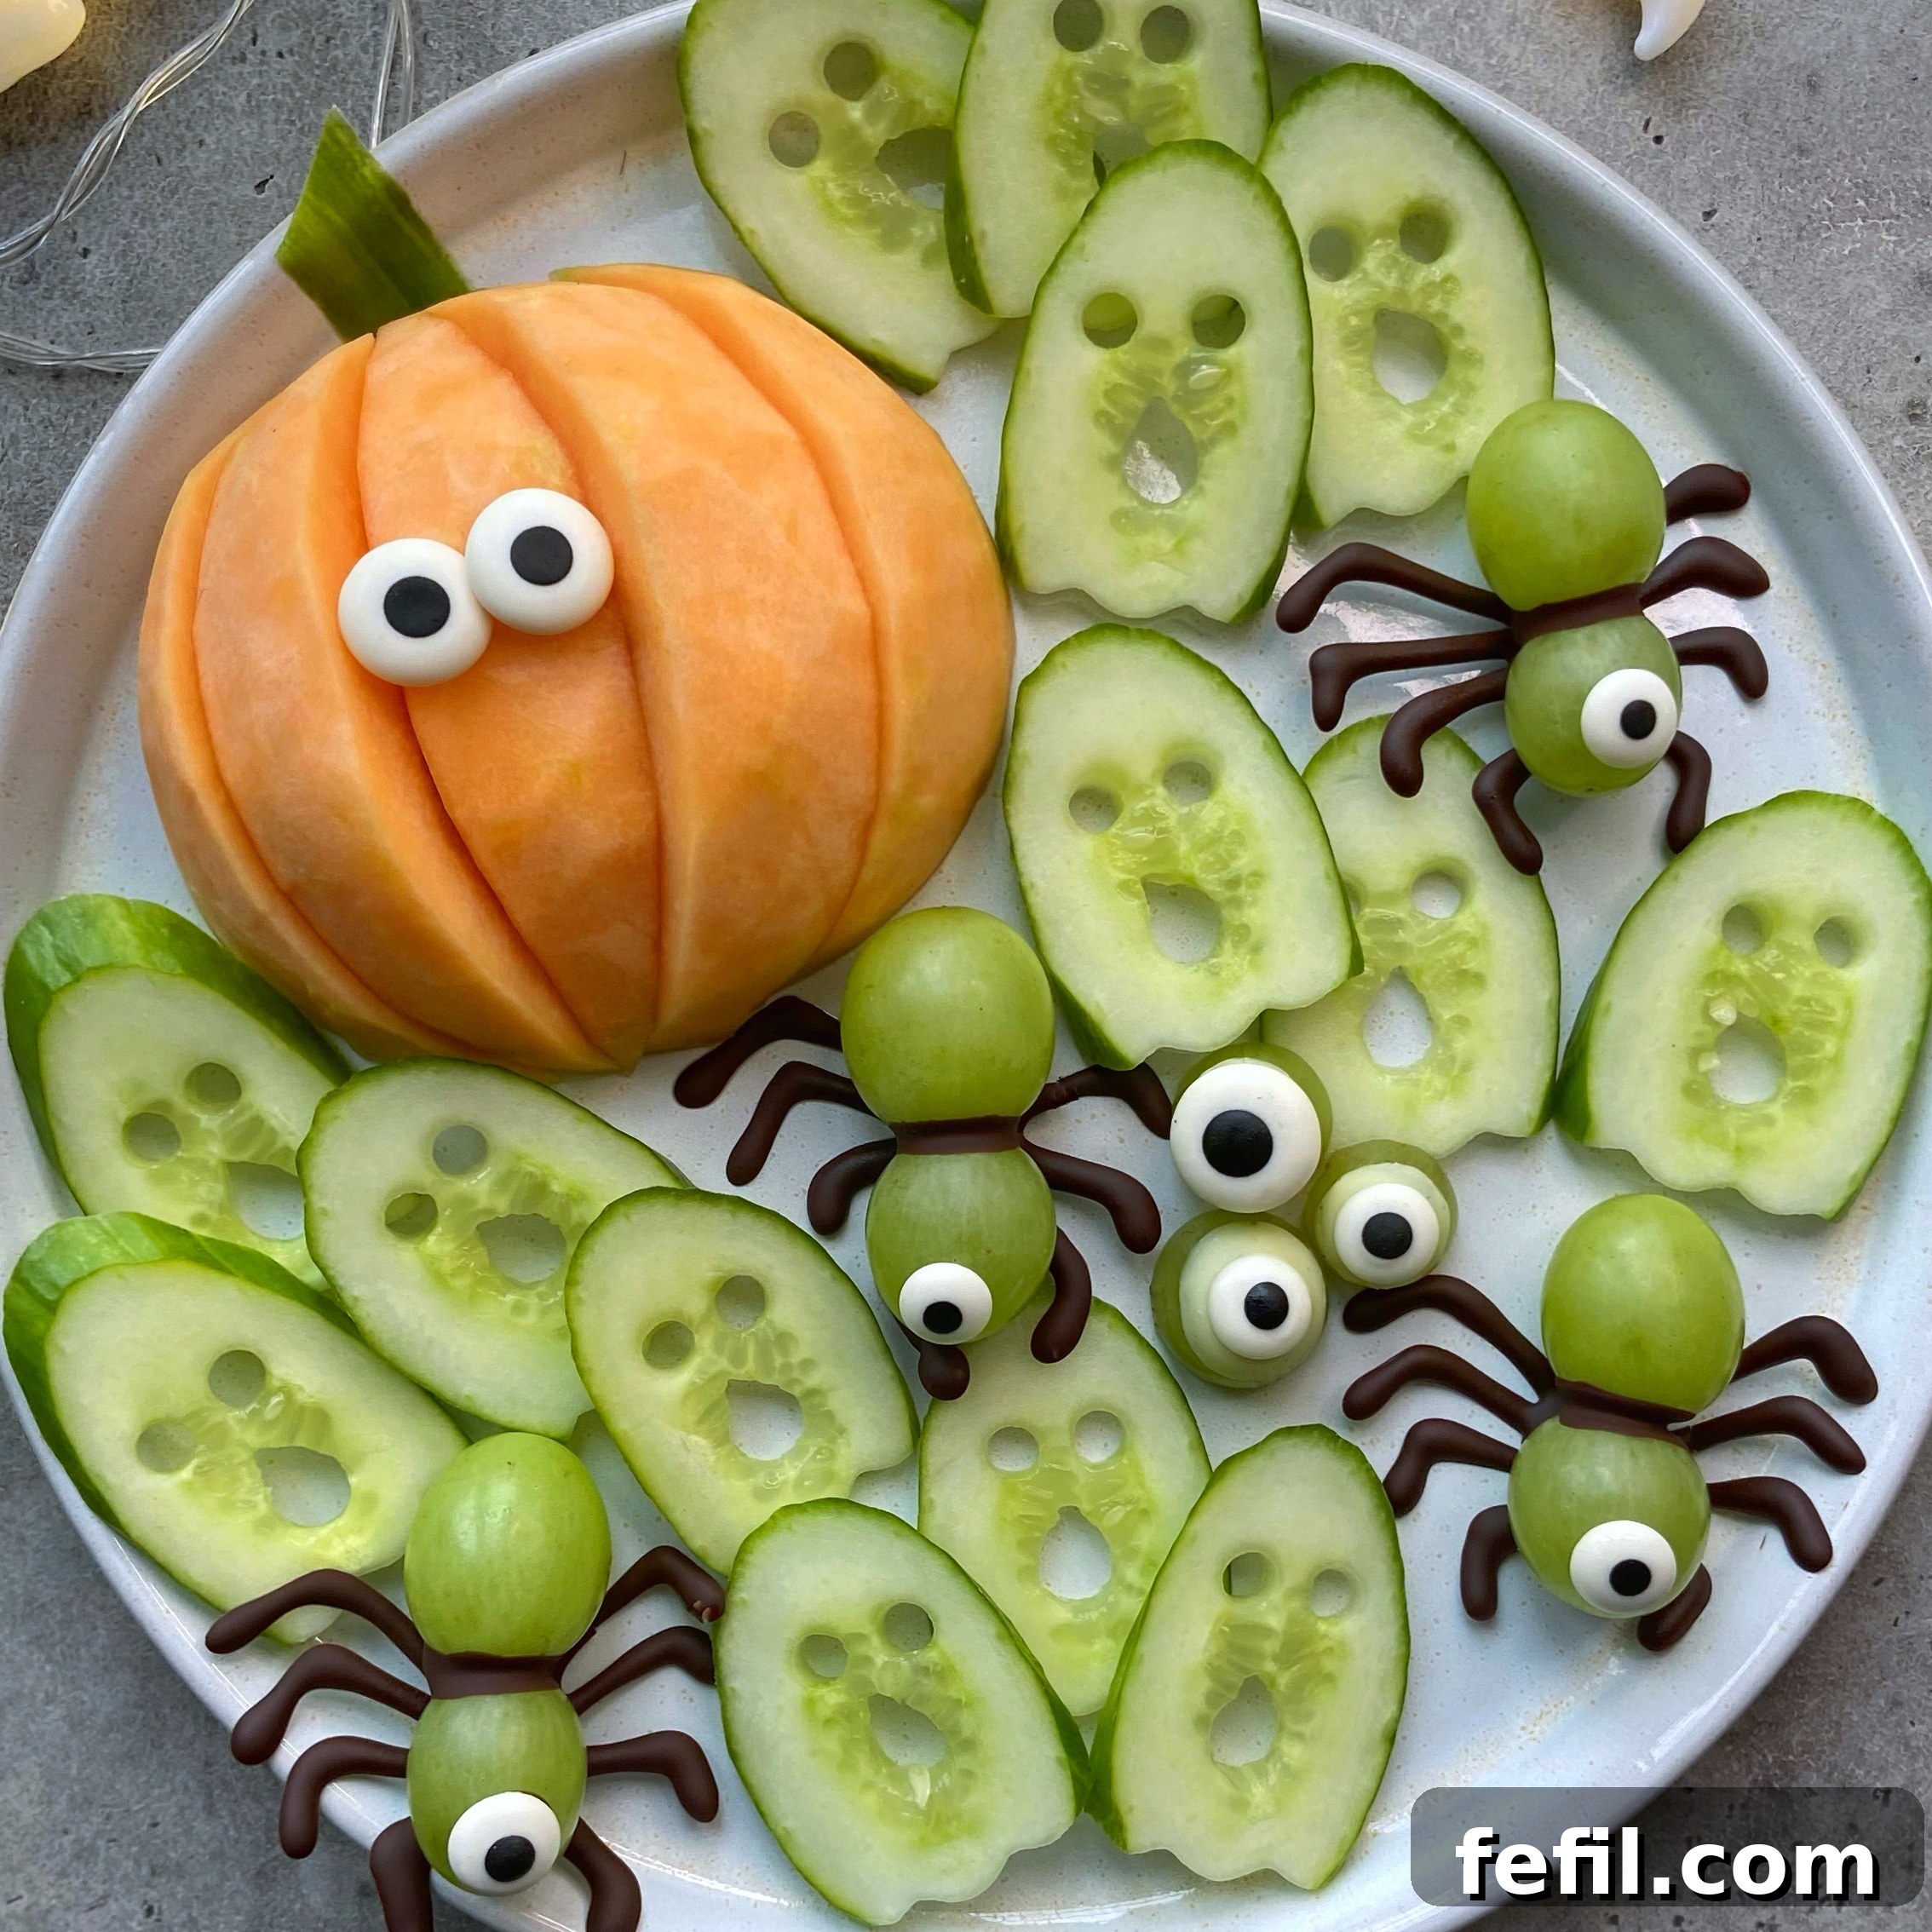
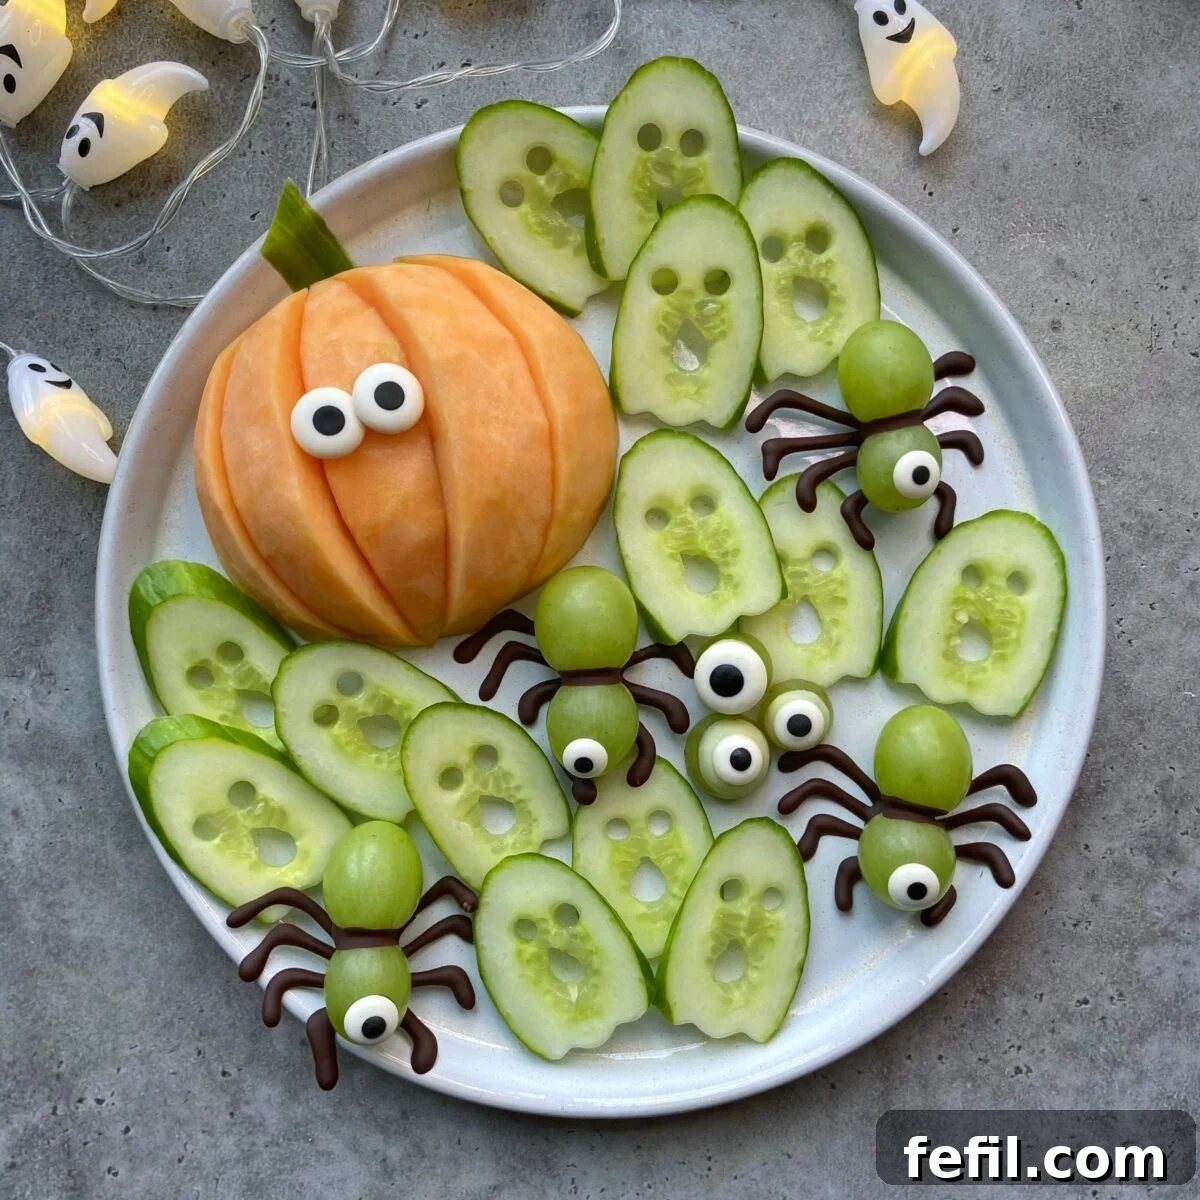
Imagine a vibrant platter adorned with a cheerful cantaloupe pumpkin as its centerpiece, surrounded by eerie cucumber ghosts, whimsical one-eyed grape spiders with crunchy pretzel legs, and playful googly grape eyeballs. This creative fruit arrangement isn’t just visually appealing; it’s a brilliant and simple way to ensure your little monsters get some essential vitamins and fiber amidst the holiday indulgence. It’s an easy, interactive, and truly memorable way to celebrate the spooky season, making healthy choices exciting for kids of all ages!
Why This Spooky Fruit Platter is a Must-Make for Your Halloween Celebration
Preparing this unique Halloween Fruit Tray offers a multitude of benefits, solidifying its place as an ideal addition to your festive spread:
- A Wholesome and Healthy Treat: Packed with fresh, hydrating fruits and crisp cucumber, this platter offers a much-needed balance to the traditional candy abundance. It’s a guilt-free way to enjoy Halloween snacks.
- Engaging and Kid-Friendly Fun: The playful designs and characters are inherently appealing to children. They’ll not only love eating these spooky creations but will also enjoy helping with the assembly, turning snack preparation into a delightful, hands-on activity.
- Effortlessly Easy to Prepare: Despite its elaborate appearance, this recipe is surprisingly simple. It involves basic cutting and melting techniques that don’t require advanced culinary skills, making it accessible for any home cook.
- Customizable to Your Liking: The beauty of a fruit platter lies in its versatility. You can easily adapt the types of fruits, substitute ingredients based on availability, or add your own spooky characters to make it uniquely yours.
- A Visually Stunning Centerpiece: The vibrant colors and clever, spooky designs ensure this fruit tray will be a conversation starter and a captivating centerpiece for any Halloween party, school event, or family gathering.
- Inclusive for Various Dietary Needs: Naturally gluten-free, this platter can also be made dairy-free by opting for dairy-free chocolate varieties, making it a great option for guests with specific dietary restrictions.
4 people
Halloween Fruit Tray
This fun and healthy Halloween platter combines a delicious melon pumpkin, whimsical cucumber ghosts, one-eyed grape spiders with pretzel legs, and playful googly eyes – perfect for a spooky yet wholesome treat during the holiday season!
50 mins
0 mins
50 mins
Leave a Comment
Print Recipe
Essential Equipment for Your Spooky Creation
- Metal straw or small round piping tip (for cutting ghost eyes)
- Parchment paper
- Piping bag or a small ziplock bag (with a corner snipped off)
- Small petal cookie cutter or a small, sharp knife (for ghost mouths)
- Sharp kitchen knife and a vegetable peeler
- Large serving platter or cutting board for assembly
- Spoon (for scooping melon seeds)
Ingredients You’ll Need for This Fun Fruit Tray
- 1/2 cantaloupe, ripe and firm
- 1 cucumber, medium-sized, crisp
- Approximately 20-24 green grapes, large and firm (some for spiders, some for googly eyes, some for filling)
- 50 grams dark chocolate, melting wafers or good quality chips
- 50 grams white chocolate, melting wafers or good quality chips
- 9-12 candy eyes, edible (ensure you have enough for the pumpkin and spiders, plus some extras)
- 10-12 pretzel sticks (for spider legs – choose thin ones if possible)
Step-by-Step Instructions to Assemble Your Ultimate Halloween Fruit Tray
Part 1: Crafting the Melon Pumpkin
- Prepare the Cantaloupe: Begin by carefully halving the ripe cantaloupe. Using a sturdy spoon, meticulously scoop out all the seeds and the fibrous strands from the center of each half, ensuring a clean cavity.
- Peel the Melon: With a sharp kitchen knife or a reliable vegetable peeler, gently remove the tough outer skin from both cantaloupe halves. Aim for a smooth, clean surface, revealing the vibrant orange flesh beneath.
- Slice and Arrange: Carefully slice each peeled cantaloupe half into approximately five thick, crescent-shaped pieces. Arrange these slices artfully on your chosen serving platter to form the appealing, rounded shape of a pumpkin. You can slightly overlap them to create a fuller, more robust appearance.
- Add a Natural Stem: Take a small piece of cucumber peel and shape it into a rectangle or a small, irregular stem-like piece. Position this at the top center of your melon pumpkin arrangement to mimic a pumpkin stem.
- Give it Eyes: Adhere two edible candy eyes onto the melon slices where the pumpkin’s eyes would naturally be. For better adhesion, a tiny dab of melted dark or white chocolate can be used as edible glue, ensuring they stay put.
Part 2: Creating Eerie Cucumber Ghosts
- Slice the Cucumber: Wash and slice the cucumber into uniform rounds, about ¼ inch thick. Then, cut each round diagonally or at a slight angle. This unique cut helps to create the elongated, flowing shape that gives these “ghosts” their spectral appearance.
- Form the Eyes: Using the end of a metal straw (the sharper the edge, the better) or a very small round piping tip, carefully punch out two small circles on each cucumber slice to create the ghost’s eyes.
- Carve the Mouth: For the ghost’s mouth, utilize a small petal-shaped cookie cutter. If you don’t have this specific cutter, a small, sharp paring knife can be used to meticulously carve a jagged, wavy, or even a simple oval mouth shape.
- Shape the Bottom (Optional for Extra Detail): To give your cucumber ghosts a more ethereal, floating look, you can carefully trim or zig-zag the bottom edge of each slice by hand using your knife. While not strictly necessary, this extra touch adds to their whimsical charm.
Part 3: Assembling Creepy Cyclops Spiders
- Melt Dark Chocolate: Melt the dark chocolate using your preferred method. A bain-marie (double boiler) offers the most controlled melting. Alternatively, you can use a microwave in short 20-30 second bursts, stirring thoroughly after each interval, or melt it directly in a small pot over very low heat, stirring constantly to prevent scorching.
- Prepare for Piping: Once the chocolate is smoothly melted, carefully transfer it into a piping bag or a small ziplock bag. If using a ziplock bag, snip a tiny corner off to create a small opening for piping.
- Form Spider Bodies: Take two large green grapes. Pipe a small blob of melted dark chocolate onto one side of a grape and firmly press it against another grape to join them, forming the spider’s body. To help the chocolate set more quickly and firmly, you can temporarily place these joined grapes onto an ice cube tray or a cold plate.
- Attach Pretzel Legs: While the chocolate joining the grapes is still soft but starting to set, gently insert four pretzel sticks on each side of the chocolate blob, creating eight sturdy, crunchy legs for your spiders.
- Add the Eye: Once the chocolate holding the grapes and pretzels has partially set, use a tiny dot of fresh melted dark chocolate to secure one candy eye onto the “head” (one of the grapes) of each spider. This makes them truly “cyclops” spiders.
- Allow to Fully Set: Place all the assembled spider components on a sheet of parchment paper. Allow them to cool and set completely, which can be sped up by placing them in the refrigerator for about 10-15 minutes. Once firm, carefully peel them from the parchment paper.
Part 4: Creating Spooky Googly Eyes (Chocolate-Dipped Grapes)
- Melt White Chocolate: Melt the white chocolate using the same careful method as the dark chocolate (bain-marie, microwave, or low heat pot). Ensure it’s smooth and free of lumps.
- Prepare Grapes: Halve the remaining green grapes.
- Dip Grape Halves: Dip the flat, cut tips of each grape half into the melted white chocolate, coating them lightly. This creates the “white” sclera of your spooky grape eyeballs.
- Adhere Candy Eyes: While the white chocolate coating is still wet and pliable, gently place a candy eye onto the center of the white chocolate-dipped grape half. Press lightly to ensure good adhesion.
- Chill to Set: Arrange these googly grape eyeballs on a fresh sheet of parchment paper and refrigerate them until the white chocolate is completely set and firm.
Part 5: Final Assembly of Your Halloween Masterpiece
- Artful Arrangement: Once all your spooky components – the vibrant melon pumpkin, eerie cucumber ghosts, whimsical cyclops spiders, and playful googly grape eyeballs – are ready and fully set, it’s time for the grand finale. Artfully arrange them on a large serving platter or cutting board, using any leftover grapes or cucumber slices to fill gaps and create a lush, abundant display.
- Serve and Enjoy: Serve your spectacular Halloween Fruit Tray immediately to enjoy the fresh flavors and crisp textures. If preparing slightly in advance, keep it chilled in the refrigerator until ready to present.
Watch the Transformation: Halloween Fruit Tray Video Tutorial
Watch this quick video to see how easily this fun and spooky Halloween Fruit Tray comes together!
Nutrition Information (Approximate Values)
Carbohydrates: 23g,
Protein: 3g,
Fat: 10g,
Saturated Fat: 6g,
Polyunsaturated Fat: 0.3g,
Monounsaturated Fat: 3g,
Trans Fat: 0.003g,
Cholesterol: 3mg,
Sodium: 36mg,
Potassium: 362mg,
Fiber: 3g,
Sugar: 19g,
Vitamin A: 2405IU,
Vitamin C: 10mg,
Calcium: 52mg,
Iron: 2mg
Nutrition information is automatically calculated based on the ingredients listed and should only be used as an approximation. Actual nutritional content may vary based on specific brands, preparation methods, and ingredient adjustments.
Expert Tips for a Frightfully Good Halloween Fruit Tray
- Select the Freshest Produce: The success of your fruit platter begins with quality ingredients. Choose a firm, sweet-smelling cantaloupe and crisp, blemish-free cucumbers. Grapes should be plump and firmly attached to their stems.
- Strategic Preparation for Success: To save time, most components of this tray can be prepared a few hours in advance. Cut the fruits, melt and shape the chocolate elements, and store them separately in airtight containers in the refrigerator. Assemble the full platter no more than 1-2 hours before serving for peak freshness and visual appeal.
- Mastering Chocolate Melting: When melting chocolate, remember to go slow and use low heat. Overheating can cause chocolate to seize and become grainy. If using a microwave, stir the chocolate every 20-30 seconds. For a bain-marie, ensure the bottom of your bowl does not touch the simmering water to prevent direct heat.
- Make it a Family Affair: This is an excellent project for getting children involved in the kitchen! Let them help with washing fruits, arranging slices, or placing the candy eyes. This hands-on involvement not only makes the preparation more enjoyable but also encourages them to eat the healthy snacks they helped create.
- Securing Those Candy Eyes: If your candy eyes aren’t sticking well to the fruit or chocolate, a tiny dot of freshly melted chocolate, a dab of edible frosting, or even a small drop of honey can act as an effective edible adhesive.
- Presentation is Paramount: Use a large, flat platter, tray, or cutting board as your creative canvas. Arrange the various fruit characters artfully, filling in any empty spaces with additional plain grapes or cucumber slices to make the tray look abundant, inviting, and truly spooktacular.
Creative Variations & Spooky Serving Suggestions
Unleash Your Creativity: Variations to Try
- Fruit Swaps for Different Characters:
- Alternative Pumpkins: Instead of cantaloupe, consider using perfectly segmented orange slices or vibrant slices of fresh mango to create a different kind of orange “pumpkin” effect.
- Ghostly Alternatives: For another fun ghost idea, dip banana slices into melted white chocolate and add mini chocolate chip eyes before chilling. Apple slices with a creamy yogurt dip can also serve as delightful, healthy specters.
- Spider Species: Experiment with black grapes or blueberries for an even darker, potentially scarier, variety of spiders. You can also use small clementines or mandarins with piped chocolate legs for larger spider bodies.
- Realistic Eyeballs: For an extra creepy touch, try using peeled lychee fruits with a blueberry or black olive stuffed inside for a surprisingly realistic eyeball effect.
- Themed Dips to Complement Your Tray:
- “Slime” Dip: Prepare a vibrant green “slime” dip by blending plain Greek yogurt with a tiny drop of green food coloring and a swirl of honey or maple syrup for sweetness.
- “Bloody” Coulis: A simple, sweet-tart raspberry or strawberry coulis (pureed and strained berries) makes an excellent and visually striking “bloody” accompaniment.
- Classic Favorites: Traditional chocolate or caramel dips are always crowd-pleasers and pair wonderfully with the fresh fruit.
- Extra Spooky Embellishments:
- To give your melon pumpkin a more rustic, branch-like stem, use a small piece of dark chocolate-covered pretzel stick.
- Disperse small, non-edible plastic spiders, bats, or other Halloween-themed trinkets around the edges of the platter (ensuring they don’t touch the food) for added decorative flair.
- Drizzle a little extra melted dark chocolate in intricate spiderweb patterns directly onto the platter before arranging the fruit, adding another layer of spooky artistry.
Serving Suggestions to Impress Your Guests:
- Grand Party Platter: The most impressive way to serve this creation is on a large, flat, Halloween-themed platter or a rustic wooden board, positioning it as the stunning centerpiece of your party table.
- Individual Spooky Portions: For easier serving, especially at parties with younger children, consider creating mini, individual versions. Assemble a small handful of grapes, a cucumber ghost, and a piece of melon in clear plastic cups or small bowls.
- Accompaniment to Other Treats: This refreshing fruit tray provides a welcome counterpoint to other, often sweeter, Halloween snacks and desserts, offering a balanced and enjoyable spread for all.
Frequently Asked Questions (FAQs) About Your Halloween Fruit Tray
- Can I prepare this Halloween Fruit Tray ahead of time?
- Yes, you can certainly do a good amount of prep work in advance! You can cut the cantaloupe and cucumber, melt and set the chocolate-covered grapes and spiders, and chill them. Store all components separately in airtight containers in the refrigerator. For the best presentation and freshness, I recommend assembling the full platter no more than 1-2 hours before you plan to serve it.
- How long will the assembled fruit tray last?
- For optimal freshness, crispness, and visual appeal, it is best consumed within 2-3 hours of assembly. If refrigerated, components like the cucumber ghosts and melon pumpkin can last up to a day, but the cucumber might slightly lose its crispness, and the chocolate decorations could develop a white “bloom” if exposed to too much humidity.
- What if I don’t have a specific cookie cutter for the ghost mouths?
- No specialized cutter? No problem at all! A small, sharp paring knife can be perfectly used to carefully cut out jagged, wavy, or even simple oval mouth shapes for your cucumber ghosts. You could also use the tip of a smaller metal straw for round mouths, or simply leave the mouths off for a minimalist ghost look.
- Can I use other types of chocolate besides dark and white?
- Absolutely! Milk chocolate or even colored candy melts can be used as alternatives to dark or white chocolate. Just be mindful that milk chocolate may be slightly softer once set, and colored candy melts will give a different, often brighter, aesthetic. Always ensure your chosen chocolate melts smoothly for easy piping.
- Are pretzel sticks essential for the spider legs, or can I skip them?
- While pretzel sticks add a fantastic crunchy texture and make the legs sturdy and easy to attach, they are not strictly necessary. If you prefer, you can pipe all eight legs directly with dark chocolate onto parchment paper. If choosing this method, be very gentle when peeling them off once set, as they can be quite delicate.
Did you bring this spooky fruit platter to life for your Halloween festivities?
We’d absolutely love to hear about your experience, see your creative twists, and learn how your guests reacted! Share your thoughts and leave a comment below.
Your feedback and ideas help inspire other Halloween enthusiasts and home chefs!